Base
| Name | |
| Country | Florida |
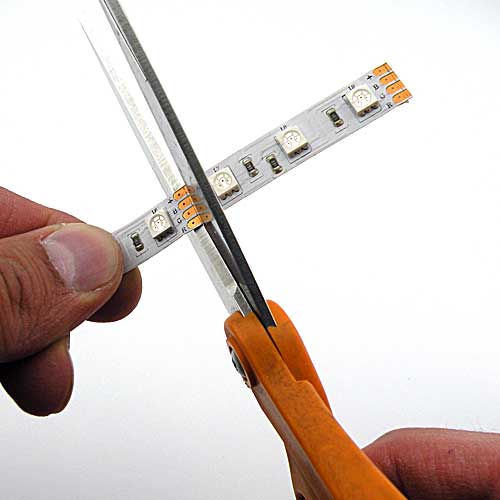
| Biography | How to Cut and Connect Waterproof LED Strip Lights During the installation of waterproof led strip lights, the length of the LED strip may not always meet our needs. Knowing how to cut and connect waterproof LED strip lights can help us better utilize these lights in indoor or outdoor settings. It is essential to understand how to handle waterproof LED light strips, especially when using them outdoors or in humid environments.
The waterproof LED strip lights we offer come in three different grades. The IP65 waterproof LED strip lights have a surface covered with PU glue or silicone glue to protect the LED lights and other electronic components from water. The IP67 waterproof LED light strip is wrapped in a hollow silicone sleeve, while the IP68 waterproof LED light strip is wrapped in a silicone sleeve filled with silicone glue. How to Cut Waterproof LED Lights Strips To cut the waterproof LED strip lights, locate the cutting line and carefully cut along it. This principle applies to all waterproof ratings of LED strip lights. After cutting, cover the end with an end cap and seal it with silicone glue to create a waterproof environment. If you have further operations planned after cutting the strip lights, follow the instructions below. How to Connect Waterproof LED Lights Strips To achieve fast and reliable connections, LED solderless connectors can be used. These connectors are easy to use and are suitable for users who don’t know how to solder. 2.1 Connecting IP65 Waterproof LED Strip Lights For indoor dry environments, you can simply use solderless connectors to connect two IP65 waterproof led lights room together. Follow these steps:
If you need to connect the strip lights on uneven surfaces, you can use two solderless connectors and a piece of bare wire to make the connection. Follow the steps below:
Read more: How to Cut and Connect Waterproof LED Strip Lights After cutting the IP67 waterproof LED light strip to the desired length, insert the strip into the connector, close the cap, and inject silicone glue through the injection hole. Make sure the glue is fully injected into the connector space to protect the LED strip light from water and moisture. 2.3 Connecting IP68 Waterproof LED Strip Lights When a waterproof LED light strip needs to be installed in multiple directions simultaneously, the LED strip shunt connector can be used to achieve this function. Additionally, a waterproof extension cable can be used to extend the distance between two waterproof LED strips. For more IP68 waterproof accessories, please refer to the link provided.
Soldering wires to waterproof best LED light strips or soldering two strips together requires some knowledge and skills. 3.1 Soldering IP65 Waterproof LED Strip Lights To solder IP65 waterproof LED strip lights, follow these steps:
3.2 Soldering IP67 Waterproof LED Strip Lights After cutting the IP67 waterproof LED light strip, which is only covered by a silicone sleeve, it can be easily pulled out, similar to soldering non-waterproof IP20 LED strip lights. Whether you are soldering two waterproof LED light strips or connecting them to wires, it is necessary to place heat shrink tubes on the connection parts and seal them with glue. 3.3 Soldering IP68 Waterproof LED Strip Lights The welding method for IP68 waterproof LED light strips is the same as that for IP65 strips. Peel off the waterproof layer at the connection parts before soldering. For specific steps, please refer to the instructions provided in the section on soldering IP65 LED strip lights. Watch the video below for a demonstration on how to weld LED strip lights. Note: The link to the video is not provided in the original content. Read more: How to Easily Install and Link Govee Lights |
© 2026 © 2023 Copyright 2023 Virtual Gamers Network. All Rights Reserved. This is an 18+ Community & Website. Having problems gambling? Visit Be Gamble Aware. || Terms & Conditions